10 Ways To Eject a Stuck CD or DVD from MacBook SuperDrive

Devices made by Apple have a reputation for being well built and made with high quality components, whether it’s the iPhone, iPad, IMac or Apple’s own version of the laptop, a MacBook. Macbooks are well known for being good quality hardware wrapped in a very stylish shell. Unfortunately, sometimes form gets in the way of function, and one of those areas on a Macbook is the CD/DVD optical drive, otherwise known as a SuperDrive.Although during general usage there shouldn’t be any problem with a SuperDrive, if for whatever reason you insert a disc that cannot be read correctly, the drive might refuse to eject the disc, even if you push the eject button a few times or right click eject from the desktop. This can be especially troublesome trying to boot because the drive will get stuck in a loop trying to read the disc and it makes the MacBook unusable until you remove the disc, you might not reach the desktop at all.

Unlike ROM drives fitted to Windows PC’s and laptops, the Macbook SuperDrive does not have a small pinhole where you can insert a paperclip to forcefully eject a stuck disc. Actually removing a stuck CD or DVD from a MacBook is pretty easy if you know how.
So, before panicking about having to send your MacBook away to get the stuck disc out, try the steps below and it might just save you time and money!
Standard Ways to Eject a Macbook SuperDrive
1. This first method is pretty straightforward. If you have a mouse or mighty mouse connected, reboot the MacBook and hold down the mouse button while booting. If you are lucky, this simple trick will work.

2. This is a follow on solution from above but applies if you don’t have a mouse connected. Press and hold the trackpad/touchpad button while booting the Macbook to try and eject the disc from the drive.
3. Although this is more of a long shot, some people have reported success by simply leaving the MacBook turned on for around 5-10 minutes while it’s attempting to boot. It might eventually boot up and the stuck CD/DVD will automatically eject.
Eject the Disc via Software
There are a few tools around that can try and forcefully eject the optical media from your drive. As it’s a bit safer to try ejecting the disc via software, we’d advise you to try these programs out before resorting to the other methods.
ForcEject is a tiny little tool of about 100KB that simply does what is intended and tries to force your Superdrive to eject its stuck optical disc.

To use the ForcEject Tool, download and run it and an icon will appear on your menu bar. Click on the icon to popup a menu and either select to eject an internal or external SuperDrive. Hopefully this will pop out the stuck disc in your drive.
5. ReDiscMove
ReDiscMove is a slightly old tool dating from 2007 but it’s even easier to try and eject your stuck disc because it consists of nothing more than a confirmation window.

Download and run ReDiscMove and it will simply popup a window asking “Are you sure you want to force the cd/dvd to eject”. Click OK to try and force the disc to eject itself. The “Avbryt” button is Swedish for cancel and to abort the attempted eject, the author must have forgot to translate the button.
6. DiskEject
DiskEject has two versions in the archive, one for Intel based systems and one for PowerPC based systems, so you need to make sure to run the correct version for your Mac. “About this Mac” from the Apple menu will tell you which is needed.
It also has three different versions of the tool for you to use. The Standard version is what you should run first, and if that doesn’t work try the Advanced version. Note the Advanced tool might cause your SuperDrive to make a few strange noises while running, this is normal. There is no interface or popup, so if it didn’t work after a few seconds, the program likely wasn’t successful.

The third version of DiskEject is a service that you can install and then call via a keyboard shortcut, a useful option if this is not a one off. Run DiskEject in the “DiskEject Service” folder and let it install the service. To set up the shortcut go to the Apple menu > System Preferences > Keyboard Shortcuts > Services > General > DiscEject, and then supply a shortcut of your choice.
7. Using the OS X Terminal
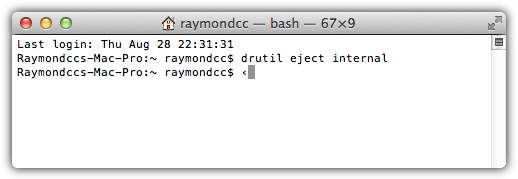
This last software based solution is using a built in command line program called drutil which can perform a number of optical disc related functions, one of which is to eject an optical disc. To use drutil, go to Applications > Utilities > Terminal and type the following if you only have one optical drive:
drutil eject
If you have an internal and external drive, use the appropriate command:
drutil eject internal
drutil eject external

Once you have done with the Terminal window you can simply close it. If none of these methods have worked so far, you will have to move onto more manual methods below.
Eject the Disc Using Other Methods
These are other methods or tricks to eject a disc from a Superdrive when it refuses to using software or the default button hold down methods, obviously be careful while attempting these.
8. This method is to tilt the MacBook to an angle of about 45 degrees so the disc would effectively drop out if it wasn’t stuck, and then press the eject key. Tilt Macbook sideways if the drive is on the side of your Macbook, forwards towards you if the drive is at the front.

9. While the tilting above often works, sometimes a more extreme version of that method is required to get the disc to eject. Instead of tilting the Macbook to 45 degrees, simply turn it completely upside down while simultaneously pressing the eject key.
10. Since the disc is being read in an infinite loop, you can try using a small piece of cardboard and insert it into the gap until it touches the disc to stop it from reading, then press the eject key few times. An example of a good material is battery pack cardboard or a thick birthday card or even a credit card may work as well.

Good luck in removing the stuck disc in your MacBook! Hopefully one of these methods works which could save you time and possibly money.


